If the building you’re living in is more than thirty years old, many of the fixtures and furniture in a manner have aged, and a lot of things in your house have gone bad since the first day you moved in.
Another issue, it’s a sad fact, is termite attack, they have strong mandibles which they use to chew through electrical wiring and wooden furniture in their quest for food made up of cellulosic materials, like wood, cloth, paper and cardboard. On a rainy night in the year 2018, my mother saw a flying termite just as it was about to scurry into a gap beneath the TV cabinet in the house, she was but she failed to treat it at once, then my mother came across a bad situation where many of wooden furniture and the old electric cables in the house were severely damaged by the termites. You never know when something unimaginable would happen in your home as if a ticking bomb is placed there. The white ants infecting all of your wooden and damp items are by their nature, can breed an army of termites if you don’t act quickly and kill it. Indeed you don’t have to wait long to see, like the situation at my mother's house.

They chewed through the sheathing of the exposed wires that were fixed to the wall surface, causing the power to go out 3 times, one of which my family smelled something burning but couldn’t find the location, and the other two required my brother to inspect the tripped miniate circuit breaker in the main power cabinet and reset it twice at least to restore power.
To their habits, Termites will eat anything that is made of wood and even damage the electrical wiring alongside their ant trails, they will chew them up mercilessly and use the tiny particles (detached microplastics) to build their kingdom. The most serious one my mother came across was on a muggy night last summer when the power to all lights and electrical appliances including air conditioners and electric fans was cut off.
If you’re reading this article, I wanna share with you my great try and tell you about some jobs you have thought to yourself "It is impossible" or "It can be done by a qualified electrical contractor." But indeed, you’re able to do it by yourself, and can be a successful DIYer as long as you have adequate knowledge of the installation obtained from any of the accredited technical institutes, and follow the correct steps, your home project can definitely be done. Because of the ageing of home wires and termite attacks, I made a great try on my own last year to rewire my mother's home which was worn out, attacked and old. Wiring a house may sound like an impossible task, it’s estimated that 99% of the landlords won’t do it on their own as this move may present a risk of electrocution.
But fine, you may try to look on the bright side, especially can save a lot of money through a self-renovation, and even reintegrate the circuits for your rooms, toilet and kitchen according to your actual needs. The thing you are most proud of will be you may increase the home value, making your home easier to sell, as well as you’re able to create a unique electrical wiring diagram with the upgrades you favored, including a one-off replacement for all the electrical outlets with dual type that make usage more flexible, for the bathroom’s light switches and outlets with the waterproof type that make yourself and family more safer, for the older miniature breakers in the main power cabinet and aging wires with newer ones, for your house.
Through such a home project, you can rewire your home more cheaply, the material cost indeed is not expensive as long as you know how to choose and where to purchase.
With so many benefits, why not try doing it by yourself?????? (read note 1 & 3 from Reminder Notes)
(1.1) Tools you’ll need to wire a house, buy them from any electrical shop at the reclamation street/shanghai street, mongkok and prepare all before you get started.
Wiring your home I do think is a simple process as long as you have enough knowledge & experience concerning the electrical installation. If you decide to make a try or to have this move, you’ll first need to purchase some tools and materials that make the jobs go smoothly before you get started.

Brief information on Home Project:
My mother’s house has a building area of approximately 700 square feet, aged 30 plus, equipped with a 63A electrical cabinet.
Second, the tools and materials required you may outline all or part of them on a list as a reference, some I had with my home project are herein listed:
Wire strippers, electrical drill, hammer, tape measure, multimeter, proper ratings of circuit breakers (MCBs), a new electrical cabinet, an estimated amount of plastic conduits and fittings, junction boxes, electrical outlets, LED lamps and basins together with enough wires…and so on for your home project are crucial. For the electrical drill, it’s a cordless drill powered by battery, not recommended to use that you have to plugin as it must make things much more difficult.
Using my home project as an example, I will walk you through wiring 3 bedrooms, 1 living room, 1 toilet and 1 kitchen in a house that would have outlets, light switches and at least one light fixture in each room. This goes for almost any room you wire as well as the standard electrical work around the house. My mother’s house has a building area of approximately 700 square feet, aged 30 plus and fitted with a 63A electrical cabinet powered by the individual meter room on each floor of the building.
(1.2) Replace your home with an Electrical Cabinet
What’s the cost of replacing an electrical cabinet which is fit for your home? The average cost to replace an electrical cabinet differs greatly based on how many amps you would like to upgrade, someone who will upgrade the rating of the circuit breaker for lighting fixtures, for example from 6A to 20A; however, you’re not recommended to have any upgrade randomly to those you are not familiar with but suggested to follow the same accommodated in the older cabinet, just replacing with new ones instead. Sometimes you cannot upgrade the amount of amps of electricity supplied to your main power cabinet, only in the case that a further upgrade under an application to be made to the electrical power company with reasonable purposes.
The cost might in a manner reach high if you take the wires, cabinet and miniature circuit breakers from well-known manufacturers, e.g. Siemens, Philips, Schneider and Clipsal. But even so, investing in your home project is a wise move that ensures your home can handle your home’s power needs and reduces the chances of future electrical problems, because it’s able to refresh your home’s functioning and helps ensure your space is safer. Furthermore, the cost varies due to factors such as the complexity of the installation, the type of wiring required and the local labor rates, thus you can save plenty of money on labor costs as long as you’re willing to become a project player to carry out your home project.
Here is the material cost I spent on a new breaker panel and the circuit breakers

1) Metal panel (HE10SN from Hager), dimensioned in 231 x 322 x 71 x 1 unit, $235
2) 6 nos of circuit breakers (MU106A, MU120A, MU132A from Hager), 6Ax1, 20Ax4 and 32Ax1, price $120 for all.
3) 1 no of ISW (MU263A from Hager), 63A, price $110
4) 1 no of RCBO (CD263B from Hager), 63A, price $250
Replacing a 20A Hager's miniature circuit breaker switch costs you $20 (if Schneider, $35); however, older fuses often tend to be more expensive than newer breaker switches.
The next step after inserting all the circuit breakers into the fixed rail is to make some modifications to the metal busbar. The busbar has two comb teeth (the first two on the left) that need to be cut off to meet the control needs of the circuit. This has to be done before you start wiring for the cabinet, so check and do it first.
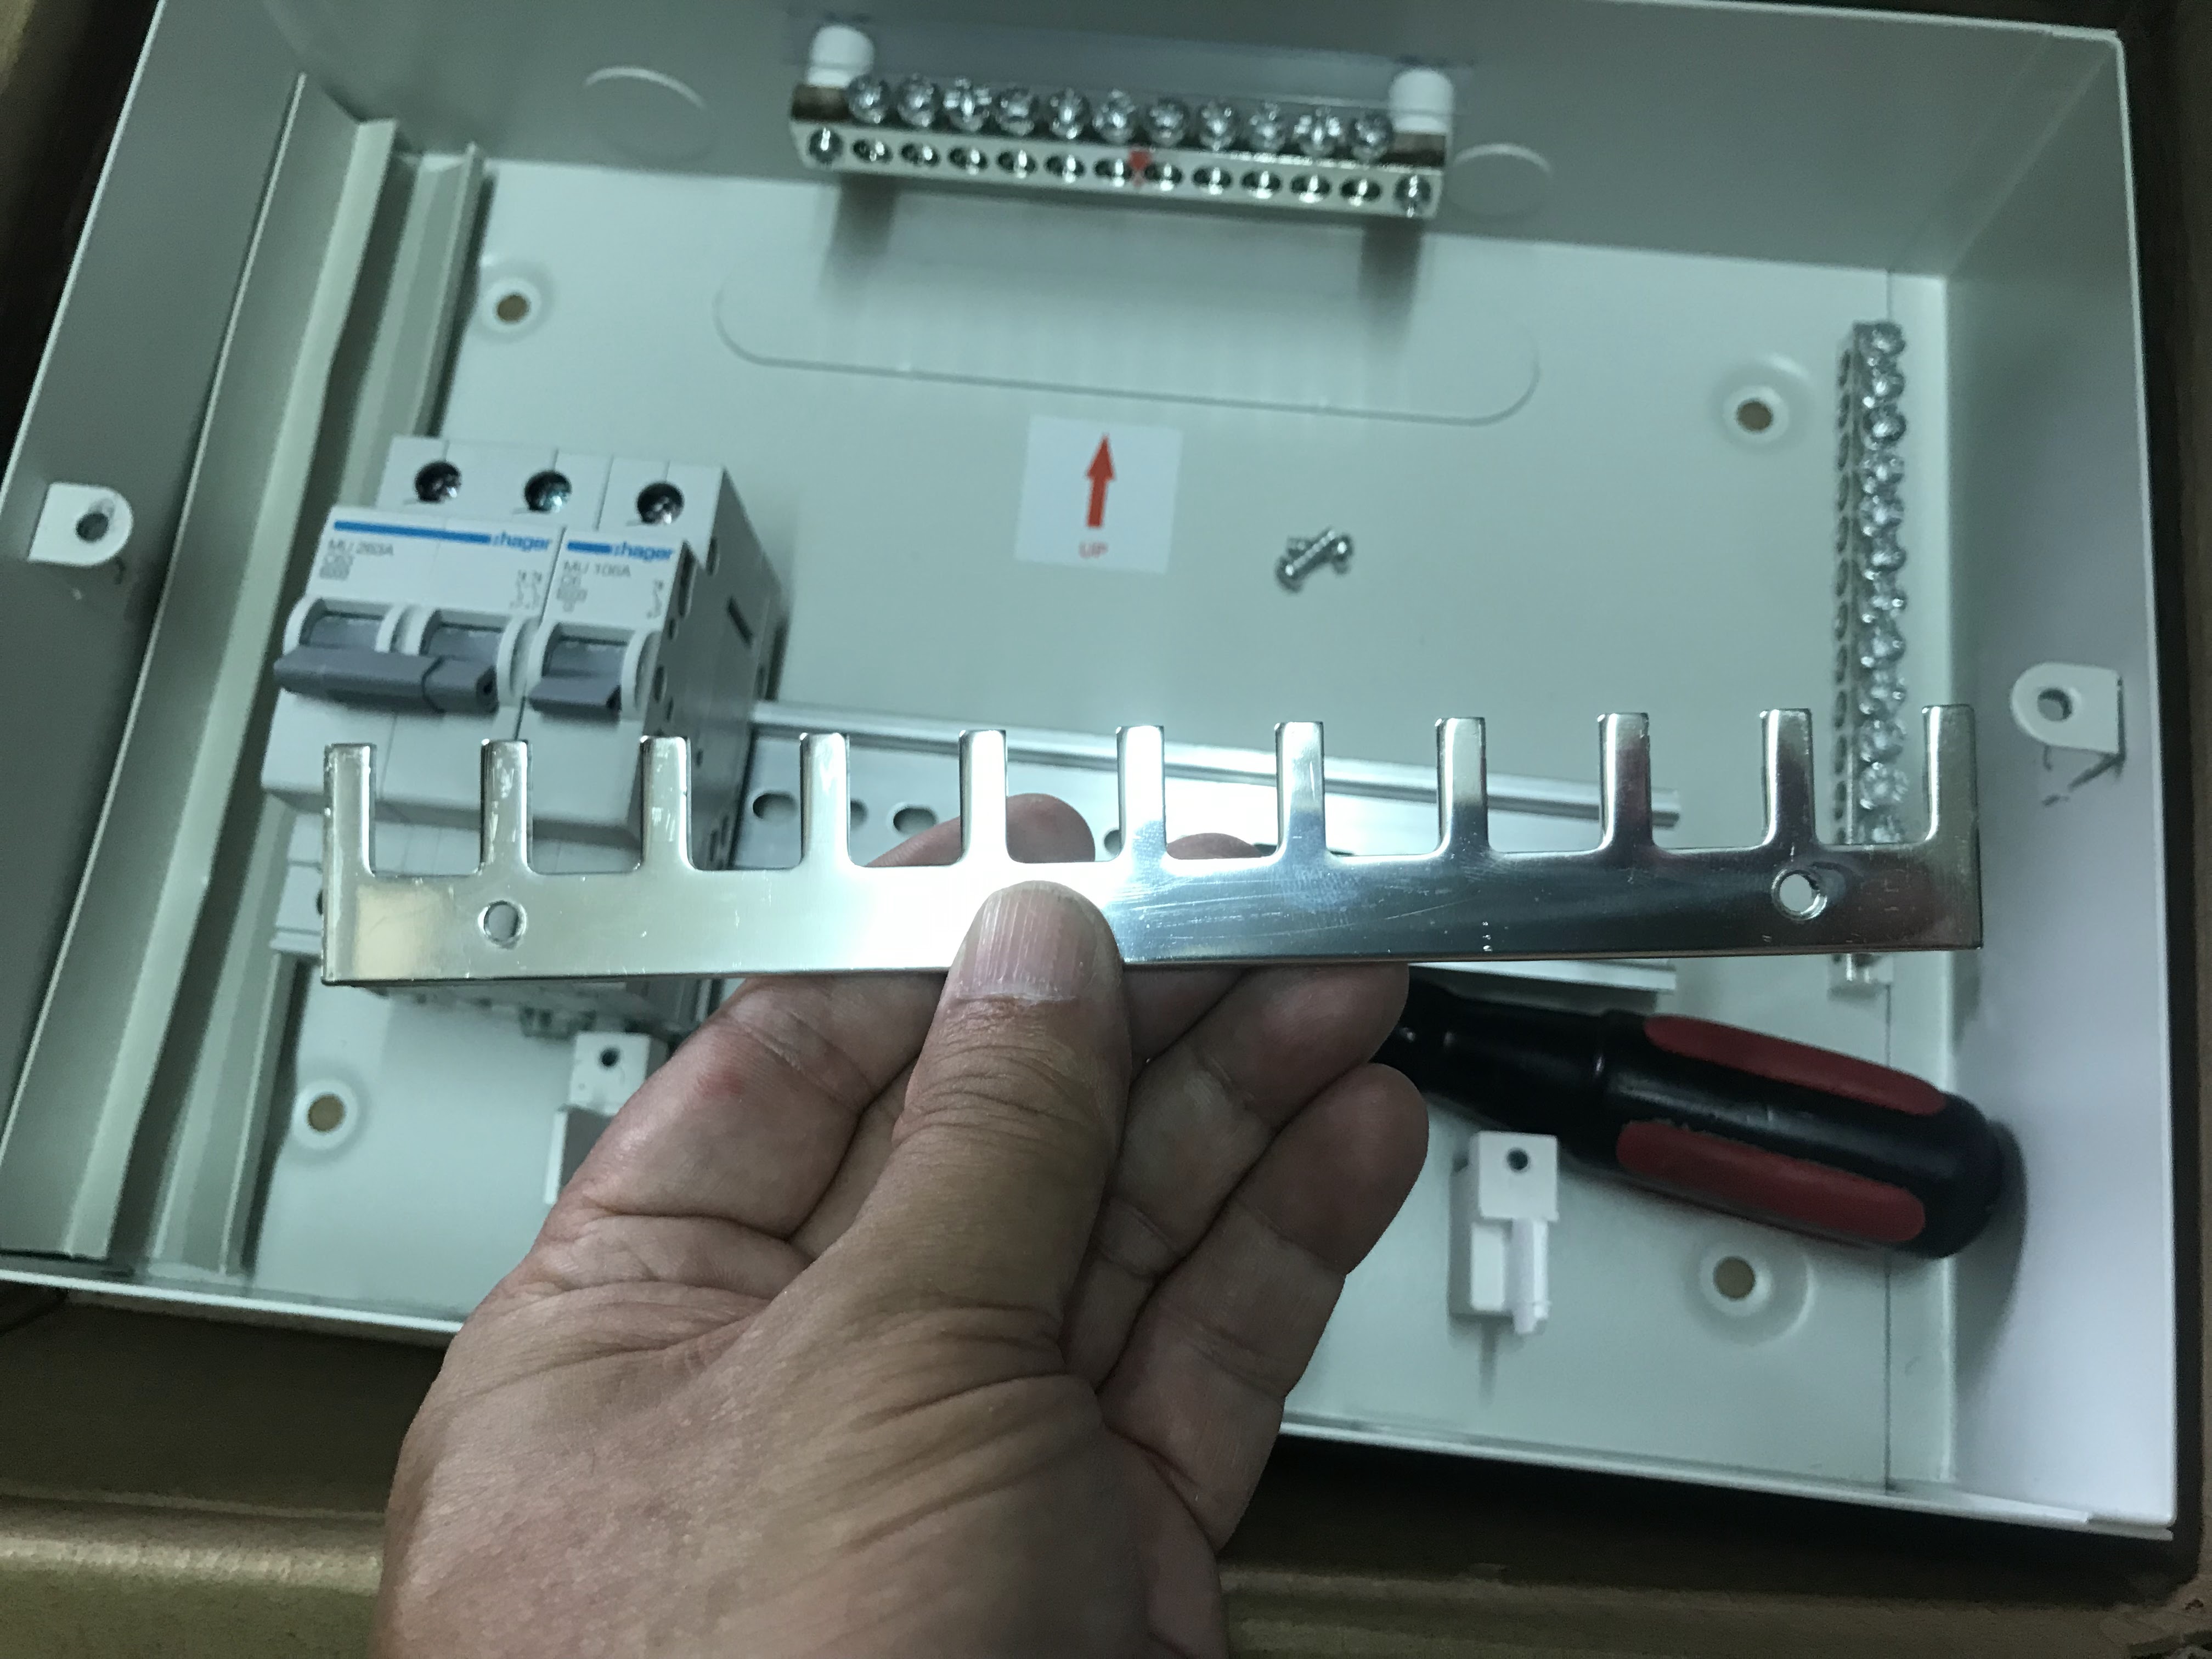


The first two comb teeth on the left side of the metal comb (busbar) have to be cut off before fixing it, such doing will make the circuit more consistent with the design intent and prevent both the cables at the outfeeds of ISW (63A Switch Disconnector) and that neutral cable at the outfeed of RCBO from being connected with other outfeeds which are all in the live phase. Some people like to put the metal busbar at the bottom of the circuit breakers, and some like to put it on top, it doesn’t matter, as long as it is logical and safe.

Then, wiring the cabinet’s circuit breakers is crucial to your electrical infrastructure, the cables to all feeder ports must be tightened and properly connected. If you’re not confident about undertaking this modification, it’s best to hire a qualified electrician or perhaps to work together with your friend who has been qualified for the work under the electricity wiring regulations and codes.

[ISW(63Ax1), RCBO(63Ax1), MCBs(6Ax1+ 20Ax4+ 32Ax1)]
Each circuit is equipped with its own miniature circuit breaker (MCB), which acts as a protective switch. In the event of an electrical overload or fault such as a short circuit, excessive current, or worn-out cables damaged by the pesky termites, these circuit breakers including the RCBO act swiftly to interrupt the flow of electricity, preventing potential hazards like fires or damage to appliances.

The thin ferrous plate is held in place to the bottom through multiple welds and needs to be removed to allow the incoming power wires to enter the panel. If yours do not come from the back, you’re further required to make an opening according to the situation. Remember that sharp edges left alongside the inner circumference of the opening may pose a safety hazard to you and to the incoming power cords, those rough edges can cause cuts, abrasions, or puncture wounds if you accidentally come into contact with them. It is good to reduce the risk of injury and short-circuit for your home project by eliminating sharp edges.
(1.3) Remove the old breaker panel and reattach the new one to the wall


The older breaker fuses are generally more expensive than the newer miniature circuit breakers and are less readily available to order due to the phaseout for years. It’s time to replace them with all new ones in one off.

The pair of power wires supplies incoming power to the main power cabinet which branches the power out into various circuits that span across the users, the wires provide 220 AC voltage and 63A max current.

The existing wires are to be temporarily retained and reconnected to the new breaker panel until the date of the migration on which you planned. Additionally, the migration work about from the old to the new wiring connection and the power energization at the final stage shall ensure minimal disruption to the non-related items of your home project.

The 63-amp electrical panel replacement work involved both replacing the existing cabinet with a new Hager brand electrical cabinet and upgrading 8 circuit breakers as needed per my home project.
(1.4) Work Review
Working Time: 10 hours
Date of completion: 15 October 2023
PS: Reminder Notes
1. You should always turn the electricity off to the main switch and verify the power is off and not fed in before you begin to replace your main power breaker panel.
2. Proper safety precautions are essential whenever you work with electricity.
3. Due to the potential risks involved when working with electrical circuits, it’s best to call in an electrician if you’re not confident in your abilities. Don’t do a DIYer if you don’t have knowledge about electrical installation, but a helper instead with a qualified worker.

No comments:
Post a Comment